Table Of Contents
Here, in Juneau Alaska, keeping my Bike Friday shifting correctly seemed like it was gong to become a full time job. We get rain ( lots of rain). Our trails are muddy ( very muddy). My Llama finally reached the point where all of my arm strength on my twist shifter was required to get a down shift. Up shifts could be accomplished by twisting the shifter and reaching back with my right foot to nudge the derailleur loose. I finally decided that this was too much and started working. I spent a great deal of time figuring things out, so let me share some tid-bits.
Why Shifting Can Be Tricky
The cable path on a Bike Friday is lengthy and there is more housing than on most single bikes. This is caused by two factors:
- The housing run from the bars to the mono-tube is longer than usual due to the lower headset height of the Bike Friday.
- There is an extra piece of housing with a severe bend that takes the derailleur cables around the bottom bracket. This is necessitated by the hinge at the bottom bracket that allows the Bike Friday to fold.
Longer cables and more housing increases drag (friction) on the inner wires. When down shifting the derailleur, you can overcome a great deal of cable friction by simply supplying more power from your body (wrist, thumb or arm depending on the type of shifter you use). It may not be pleasant, but down shifts can be achieved. Up shifts, on the other hand, are performed by releasing cable from the shifter. The cable goes slack and the spring on the derailleur moves the chain down the cluster until the cable is once again taught. If there is too much friction on the inner wire, the derailleur spring will be unable to overcome it, and you will be unable to shift to a higher gear.
Where I Focused
Experimentation allowed the following observations:
- The sharp bend in the cables above the bottom bracket is the greatest source of drag on the inner wires.
- The sharp bend in the rear cable as it loops around to reach the rear derailleur is the second greatest source of drag on the inner wire.
- The three speed hub seems to have a stronger spring than the derailleur, and consequently a higher tolerance to cable friction.
- The dip of the cable housing as it passes under the bottom bracket provides an ideal “trap” for water. Water runs down the inner wire, collects in the bottom of this section of housing and rust forms very quickly. The rust (even if very light) provides yet another source of cable drag.
- High quality cable housing is very important. Shimano SIS, compressionless housing from my parts box was used throughout this installation.
Steps Taken
To remove some of this cable friction, I followed a tip from Doug Heydon of Bike Friday, and installed two Avid Rollamajigs  on the rear derailleur cable. The first went where the Rollamajig was designed to go: on the rear derailleur
The second was modified to work in place of the sharp bend in the cable above the bottom bracket. My Llama came set up with the rear brake cable routed to the outside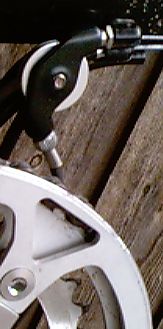 of the derailleur cable (as it made its way down the mono-tube). I swapped the locations of the derailleur cable and rear brake cable. It required that I readjust the rear brake, but it let the new Rollamajig be mounted where it could move freely on the frame. Because it isn’t installed in its originally designed position, the second Rollamajig required the addition of a small cable adjuster from my parts bin, but it works very nicely now.
Another option in this location is a Travel Agent from Quality Bicycle Products (QBP). This device is designed to be an adapter to allow the use of direct pull (V) brakes with standard brake levers. It does, however, offer a straight around cable path that is just what is required here. It is available with or without a cable adjuster. 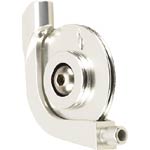 Check your LBS for availability
To try to reduce the amount of water collecting in the section of housing under the bottom bracket, I installed cable ends with o-ring seals at the second Rollamajig (visible in the photo above) and at the shifters. I reached in my parts bin and found some Shimano Deore XT sealed cable ends circa 1989. I’m not sure they are still available, but something similar could probably be made with a standard cable end with a separate o-ring of the correct diameter inside. I suspect that the o-rings add a little bit of drag, but it does keep the water out of the housing..
Other Things To Try
- Gore RideOn cables would have been the next step. The Gore cables offer a sealed cable (no more o-rings, no more water problems) and very low friction housing (which could render the Rollamajigs unnecessary). They are, however, very expensive and rumored to have a short (from my perspective) service life (about a year).
- One of the work-around solutions I used while experimenting was the replacement of the housing loop under the bottom bracket with a straight length of housing. This housing ran directly behind the chain rings from the cable stop on the mono-tube to the cable stop on the chain stay. It provided very nice shifting properties, but folding my Llama while it was installed was impossible. I removed this section of housing when I installed the Rollamajig solution, but taped it inside my suitcase. That little section of housing may come in handy on the road some day.
- Replace this whole derailleur mess with a 14 speed internally geared hub from Rholoff. The cost of this is about $900 for the hub. Green Gear is now able to sell wheels based on this hub and will sell you a bike built around it.
Page History
This page dates from the late ’90s. A lot has changed in bicycle, photo, and web technology since then. Please accept the information and images in the spirit in which they are intended, dated but possibly helpful.